Difference between revisions of "Geopsy: Signal drag&drop"
| (7 intermediate revisions by 2 users not shown) | |||
| Line 1: | Line 1: | ||
| − | The signal ''drag & drop'' mechanism | + | The signal ''drag & drop'' mechanism allows moving a signal to a [[Geopsy: Signal Viewer|signal viewer]] (a [[Geopsy: Table|table]], a [[Geopsy: Graphic|graphic]], a [[Geopsy: Map|map]] or a [[Geopsy: Chronogram|chronogram]]). To ''drag & drop'' a signal, press left mouse button on a ''source'' (see below), move the mouse to the ''destination'' (see below) and release the mouse button. |
== From external source to Geopsy == | == From external source to Geopsy == | ||
| − | |||
| − | Select the files in your directory, left | + | [[Image:DragDropExternal2.png|thumb|right|600px|Drag and drop files from external source]] |
| − | + | ||
| − | + | This option allows loading a signal file from a file browser (Desktop, Finder, Explorer, Dolphin, Total Commander,...) to Geopsy. The result is similar to [[Loading and viewing signals|importing files]]. | |
| + | |||
| + | Select the files in your directory, press the left mouse button, move the mouse to any place inside Geopsy window and release mouse button. The files are now imported inside Geopsy environment. | ||
<br style="clear: both"/> | <br style="clear: both"/> | ||
| − | == From | + | == From ''Files'' panel to [[Geopsy: Signal Viewer|signal viewers]] == |
| + | |||
[[Image:DragDropViewers.png|thumb|right|400px|Drag & drop a signal file to a new Table]] | [[Image:DragDropViewers.png|thumb|right|400px|Drag & drop a signal file to a new Table]] | ||
[[Image:DragDropGroup.png|thumb|right|400px|Drag & drop signal files from a group to a new Graphic]] | [[Image:DragDropGroup.png|thumb|right|400px|Drag & drop signal files from a group to a new Graphic]] | ||
| − | |||
| − | + | Signal files can be ''dragged & dropped'' from the ''Files'' panel (on the left for the default configuration) to a [[Geopsy: Signal Viewer|signal viewer]] (a [[Geopsy: Table|table]], a [[Geopsy: Graphic|graphic]], a [[Geopsy: Map|map]] or a [[Geopsy: Chronogram|chronogram]]). Only the selected files in ''Files'' panel are considered. Signals can be viewed either in a new or added to an existing signal viewer. | |
| − | * | + | |
| + | === ''Drag & drop'' to a new signal viewer === | ||
| + | |||
| + | ==== First method (slowest) ==== | ||
| + | |||
| + | * Create a new signal viewer by using [[Geopsy: View menu]] or by clicking on a viewer icon in the [[Geopsy: Toolbar|toolbar]]: [[Geopsy: Table|table]] [[Image:Icontable.png|middle]], [[Geopsy: Graphic|graphic]] [[Image:IconGraphic.png|middle]], [[Geopsy: Map|map]] [[Image:IconMap.png|middle]] or [[Geopsy: Chronogram|Chronogram]] [[Image:IconGraphic.png|middle]] | ||
| + | * Select files, SHIFT and CTRL (or CMD for Mac) are accepted for multiple and complex selections. | ||
| + | * Press left mouse button on the ''Files'' selection | ||
| + | * Move the mouse to the created signal viewer | ||
| + | * Release the mouse button. | ||
| + | |||
| + | The signals contained in the selected files are now displayed in the signal viewer. | ||
| + | |||
| + | ==== Second method (a faster alternative) ==== | ||
| + | |||
| + | * Select files | ||
| + | * Press left mouse button on the ''Files'' selection | ||
| + | * Move the mouse to a signal viewer icon in the [[Geopsy: Toolbar|toolbar]] | ||
| + | * Release the mouse button | ||
| + | |||
| + | The signals contained in the selected files are now displayed in a new signal viewer. | ||
| + | ==== Third method (another fast alternative) ==== | ||
| − | * '' | + | * Select files |
| + | * Right-click on the the ''Files'' selection | ||
| + | * Select the viewer in the context menu | ||
| + | The signals contained in the selected files are now displayed in a new signal viewer. | ||
| − | + | === ''Drag & drop'' to an existing signal viewer === | |
| + | |||
| + | * Select files | ||
| + | * Press left mouse button on the ''Files'' selection | ||
| + | * Move the mouse to the an existing signal viewer | ||
| + | * Release the mouse button. | ||
| + | |||
| + | The signals contained in the selected files are now added in the signal viewer. | ||
| + | |||
| + | '''Note: these procedures are also valid to ''drag & drop'' signals from [[Geopsy: Groups|group]] to a signal viewer.''' | ||
<br style="clear: both"/> | <br style="clear: both"/> | ||
| + | |||
| + | == From signal files to the [[Geopsy: Tools|advanced signal processing tools]] == | ||
| + | |||
| + | Signal files can be ''dragged & dropped'' directly to one of the [[Geopsy: Tools|advanced signal processing]] icons [[Image:IconToolbar.png|400px|middle]] in order to compute [[H/V spectral ratio]], [[Spectral amplitudes]], [[Ambient vibration array]],.... | ||
| + | |||
| + | * Select files, SHIFT and CTRL (or CMD for Mac) are accepted for multiple and complex selections. | ||
| + | * Press left mouse button on the ''Files'' selection | ||
| + | * Move the mouse to an advanced signal processing icon | ||
| + | * Release the mouse button. | ||
| + | |||
| + | The signals are displayed in a new signal viewer and the corresponding [[Geopsy: Tools|advanced signal processing toolbox]] is attached to it. | ||
| + | |||
| + | Note: [[Geopsy: Waveform menu|Basic signal processing]] are not allowed in a signal viewer with an attached [[Geopsy: Tools|tool]]. | ||
== From viewers to viewers == | == From viewers to viewers == | ||
| − | Signal files can be also '' | + | |
| + | Signal files can be also ''dragged & dropped'' from a signal viewer to another signal viewer. All combinations are available, however signal selection prior ''drag & drop'' is possible only for [[Geopsy: Table|tables]] and [[Geopsy: Map|maps]]. | ||
Latest revision as of 16:18, 11 March 2010
The signal drag & drop mechanism allows moving a signal to a signal viewer (a table, a graphic, a map or a chronogram). To drag & drop a signal, press left mouse button on a source (see below), move the mouse to the destination (see below) and release the mouse button.
Contents
From external source to Geopsy
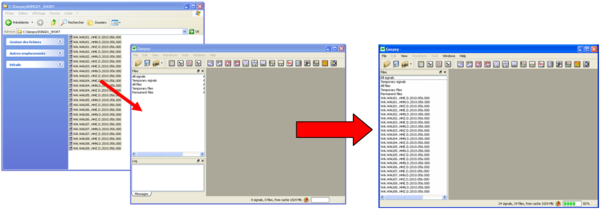
This option allows loading a signal file from a file browser (Desktop, Finder, Explorer, Dolphin, Total Commander,...) to Geopsy. The result is similar to importing files.
Select the files in your directory, press the left mouse button, move the mouse to any place inside Geopsy window and release mouse button. The files are now imported inside Geopsy environment.
From Files panel to signal viewers
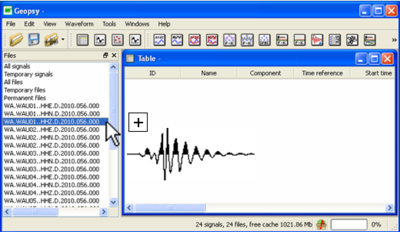
Signal files can be dragged & dropped from the Files panel (on the left for the default configuration) to a signal viewer (a table, a graphic, a map or a chronogram). Only the selected files in Files panel are considered. Signals can be viewed either in a new or added to an existing signal viewer.
Drag & drop to a new signal viewer
First method (slowest)
- Create a new signal viewer by using Geopsy: View menu or by clicking on a viewer icon in the toolbar: table
 , graphic
  , map
, map  or Chronogram
- Select files, SHIFT and CTRL (or CMD for Mac) are accepted for multiple and complex selections.
- Press left mouse button on the Files selection
- Move the mouse to the created signal viewer
- Release the mouse button.
The signals contained in the selected files are now displayed in the signal viewer.
Second method (a faster alternative)
- Select files
- Press left mouse button on the Files selection
- Move the mouse to a signal viewer icon in the toolbar
- Release the mouse button
The signals contained in the selected files are now displayed in a new signal viewer.
Third method (another fast alternative)
- Select files
- Right-click on the the Files selection
- Select the viewer in the context menu
The signals contained in the selected files are now displayed in a new signal viewer.
Drag & drop to an existing signal viewer
- Select files
- Press left mouse button on the Files selection
- Move the mouse to the an existing signal viewer
- Release the mouse button.
The signals contained in the selected files are now added in the signal viewer.
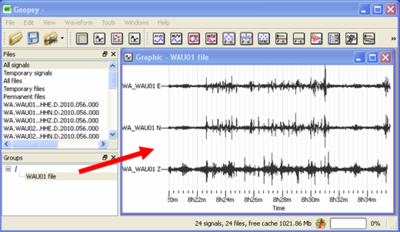
Note: these procedures are also valid to drag & drop signals from group to a signal viewer.
From signal files to the advanced signal processing tools
Signal files can be dragged & dropped directly to one of the advanced signal processing icons ![]() in order to compute H/V spectral ratio, Spectral amplitudes, Ambient vibration array,....
in order to compute H/V spectral ratio, Spectral amplitudes, Ambient vibration array,....
- Select files, SHIFT and CTRL (or CMD for Mac) are accepted for multiple and complex selections.
- Press left mouse button on the Files selection
- Move the mouse to an advanced signal processing icon
- Release the mouse button.
The signals are displayed in a new signal viewer and the corresponding advanced signal processing toolbox is attached to it.
Note: Basic signal processing are not allowed in a signal viewer with an attached tool.
From viewers to viewers
Signal files can be also dragged & dropped from a signal viewer to another signal viewer. All combinations are available, however signal selection prior drag & drop is possible only for tables and maps.


