Difference between revisions of "SciFigs: Curve Browser"
| Line 7: | Line 7: | ||
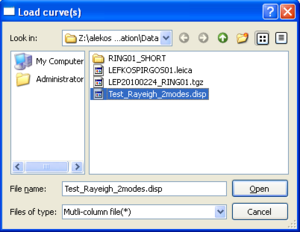
[[Image:LoadCurve.png|thumb|left|300px|Loading a curve]] | [[Image:LoadCurve.png|thumb|left|300px|Loading a curve]] | ||
| − | By pressing button Load a pop up window appears and you can select the ASCII file that has in a multicolumn file format the Dispersion Curve information. | + | By pressing button Load a pop up window appears and you can select the ASCII file that has in a [[SciFigs: multicolumn file |multicolumn file format]] the Dispersion Curve information. |
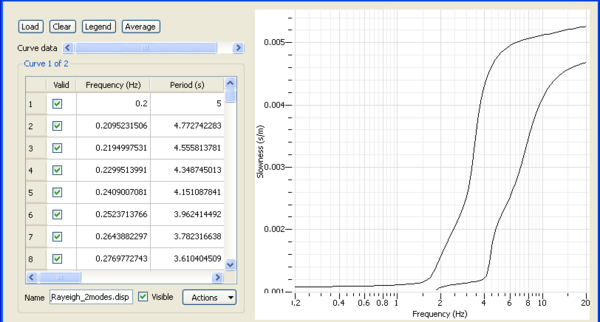
[[Image:CurveBrowser.png|thumb|right|600px|Curve Browser]] | [[Image:CurveBrowser.png|thumb|right|600px|Curve Browser]] | ||
All curves loaded or created so far are displayed on the attached plot (right hand side). Only one curve is shown in the Table each time (left hand side). To change the active/shown curve, move the horizontal scroll bar above the Table entitled Curve Data. The title of the frame just below the scroll bar give the index and the total number of available curves. All items within this frame apply to current curve: | All curves loaded or created so far are displayed on the attached plot (right hand side). Only one curve is shown in the Table each time (left hand side). To change the active/shown curve, move the horizontal scroll bar above the Table entitled Curve Data. The title of the frame just below the scroll bar give the index and the total number of available curves. All items within this frame apply to current curve: | ||
Revision as of 12:45, 8 March 2010
Contents
Loading curves
Click on Load button
- Load a dispersion curve from a text file (e.g. Test_Rayeigh_2modes.disp). It is a theoretical curve computed using tutorial Computing a theoretical dispersion curve.
Note: you can load as many curve as you want. However, you MUST keep only the curves that you want to invert. PLEASE do not forget to REMOVE the Data Sets you do not want to be used in the Inversion.
By pressing button Load a pop up window appears and you can select the ASCII file that has in a multicolumn file format the Dispersion Curve information.
All curves loaded or created so far are displayed on the attached plot (right hand side). Only one curve is shown in the Table each time (left hand side). To change the active/shown curve, move the horizontal scroll bar above the Table entitled Curve Data. The title of the frame just below the scroll bar give the index and the total number of available curves. All items within this frame apply to current curve:
- values in the table
- menu Actions
- curve name
- visible button
To identify curves on the plot, it is handy to play with the Visible check box. It does not remove the curve but just hides it on the plot.
Clearing curves
You can also associate a special color, pen and symbol to each curve with the Legend button. Naming curves with unique names might be also useful.
Actions
Save
Saves current curve to a text file made of 4 columns: frequency, slowness, standard deviation and weight. The log is save as comments before the curve samples.
Log
Shows a log of all actions performed on the current curve.
Remove
Removes the current curve from the plot
Resample
Reorganize sampling of the current curve. Samples can be distributed on a log, linear or curvilinear scale. You can define any frequency range even outside the current available range. In this later case, samples are extrapolated and set as invalid. If the defined range is smaller than the current range, outside samples are not affected. To remove them use Cut.
Cut
Removes all samples outside a defined frequency or period range.
Smooth
Smooths the curve... currently not implemented.
Manual editing
You can edit all values like in a usual work sheet.
If you want to set the same value to several rows:
- Selected the rows (by clicking on the left header to select the full row)
- Edit one cell of the selection
- Hit enter or move to another cell to validate
- A dialog box should pop up asking if you want to extend the edition to all other selected rows.
Averaging or merging curves
Once you have at least two curves loaded, you can select the following action to average or merge several curves. A dialog box lets you select the curve to average or merge. Merging applies to non-overlapping frequency ranges, average applies to overlapping ranges. Both actions are automatically performed. If more than two curves are selected, curves are averaged or merged one by one using the same process:
- Build a vector with X values from the two curves.
- Resample both curves with this common X sampling.
- For each X value and for both curves, we have mean, variance, and weight (number of values used to compute statistics)
Where:
is the weight or equivalently the number of items in the statistical population used for the computation of and . is the ith item in population j.
The mean and variance computed over the whole population is then:


![{\displaystyle {\begin{array}{lll}\mu ^{(j)}&=&{\frac {\sum _{i=1}^{w^{(j)}}{s_{i}^{(j)}}}{w^{(j)}}}\\\sigma ^{(j)}&=&{\frac {\sum _{i=1}^{w^{(j)}}{(s_{i}^{(j)}-\mu ^{(j)})^{2}}}{w^{(j)}-1}}\\&=&{\frac {\sum _{i=1}^{w^{(j)}}{[(s_{i}^{(j)})^{2}+(\mu ^{(j)})^{2}-2s_{i}^{(j)}\mu ^{(j)}]}}{w^{(j)}-1}}\\&=&{\frac {\sum _{i=1}^{w^{(j)}}{(s_{i}^{(j)})^{2}}+w^{(j)}(\mu ^{(j)})^{2}-2\mu ^{(j)}\sum _{i=1}^{w^{(j)}}{s_{i}^{(j)}}}{w^{(j)}-1}}\\&=&{\frac {\sum _{i=1}^{w^{(j)}}{(s_{i}^{(j)})^{2}}+w^{(j)}(\mu ^{(j)})^{2}-2w^{(j)}(\mu ^{(j)})^{2}}{w^{(j)}-1}}\\&=&{\frac {\sum _{i=1}^{w^{(j)}}{(s_{i}^{(j)})^{2}}-w^{(j)}(\mu ^{(j)})^{2}}{w^{(j)}-1}}\end{array}}}](https://wikimedia.org/api/rest_v1/media/math/render/svg/3a3eb30ea598e65d23510b78d4f219ba1848de1e)


