Difference between revisions of "Geopsy: Set header"
| Line 2: | Line 2: | ||
== General presentation == | == General presentation == | ||
| − | |||
| − | + | This help refers to the latest development release (geopsypack>=2.5.0) | |
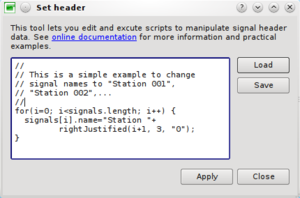
| + | [[Image:Setheaders.png|thumb|right|300px|Dialog box to editing header information]] | ||
| − | All | + | From any active [[Geopsy: Signal Viewer|signal viewer]] (which is by definition a list of signals), click on menu item ''Edit/Set headers''. A dialog box will appear. You can type any script in the left editor. A basic loop to assign a new name to all signals is proposed as the default script. Comment or remove this script and enter your own code. |
| + | |||
| + | All statements are separated by ''';''' (like in C or C++). If a line begins with '''//''', all text is ignored until the end of the line (like C or C++ comments). In the same way, all text included between '''/*''' and '''*/''' is considered as a comment. Commenting parts of a script may be interesting to solve errors. | ||
| + | |||
| + | Upon starting the script, an array called ''signals'' contains the list of all signals of the current viewer. Each signal is indexed by its position in the current viewer, starting at index 0. For instance, | ||
| + | |||
| + | signals[i] | ||
| + | |||
| + | Refers to the (i+1)th signal in the current viewer. In a table, index are displayed on the left side starting at 1. Be careful that they start at 0 in array ''signals''. The number of signals in the current viewer is return by the expression | ||
| + | |||
| + | signals.length | ||
| + | |||
| + | Hence, the basic loop to assign values to signal headers will have a structure similar to this one: | ||
| + | |||
| + | for(i=0; i<signals.length; i++) { | ||
| + | signals[i].deltaT=0.01; | ||
| + | } | ||
| + | |||
| + | In this example, ''deltaT'', the sampling period is set to 0.01 seconds or a sampling frequency of 100 Hz. | ||
| − | |||
| − | |||
<br style="clear: both"/> | <br style="clear: both"/> | ||
| + | |||
| + | Below this point, the information is not related to the latest development release. | ||
There are various assignment operators working for numbers and character strings: | There are various assignment operators working for numbers and character strings: | ||
Revision as of 20:58, 11 August 2011
This section explains how to modify header information stored in a database in a very efficient way. Any information about signals can be viewed in a table. Signals can be modified one by one by cell editing (Ctrl+K). For huge number of signals this is boring and time consuming. Instead, you can create small scripts and apply them with one single click. The syntax for these scripts is rather simple. They are based on the ECMAScript scripting language like waveform script language.
Contents
General presentation
This help refers to the latest development release (geopsypack>=2.5.0)
From any active signal viewer (which is by definition a list of signals), click on menu item Edit/Set headers. A dialog box will appear. You can type any script in the left editor. A basic loop to assign a new name to all signals is proposed as the default script. Comment or remove this script and enter your own code.
All statements are separated by ; (like in C or C++). If a line begins with //, all text is ignored until the end of the line (like C or C++ comments). In the same way, all text included between /* and */ is considered as a comment. Commenting parts of a script may be interesting to solve errors.
Upon starting the script, an array called signals contains the list of all signals of the current viewer. Each signal is indexed by its position in the current viewer, starting at index 0. For instance,
signals[i]
Refers to the (i+1)th signal in the current viewer. In a table, index are displayed on the left side starting at 1. Be careful that they start at 0 in array signals. The number of signals in the current viewer is return by the expression
signals.length
Hence, the basic loop to assign values to signal headers will have a structure similar to this one:
for(i=0; i<signals.length; i++) {
  signals[i].deltaT=0.01;
}
In this example, deltaT, the sampling period is set to 0.01 seconds or a sampling frequency of 100 Hz.
Below this point, the information is not related to the latest development release.
There are various assignment operators working for numbers and character strings:
SignalData =  value      // Set SignalData to value
value1 + value2          // Sum or concatenation operator
SignalData += value      // Set SignalData to the sum of its previous content with value
value1 == value2  	 // Returns a bool value, true if value1 and value2 are equal
value1 != value2  	 // Returns a bool value, true if value1 and value2 are not equal
Some assignment operators work only for numbers:
value1 - value2          // Difference operator
value1 - value2          // Multiplication operator
value1 / value2          // Floating point division operator
value1 DIV value2        // Integer division operator. E.g. 5 DIV 2 produces 2
value1 < value2  	 // Returns a bool value, true if value1 is less than value2
value1 ≤ value2  	 // Returns a bool value, true if value1 is less than or equal to value2
value1 > value2  	 // Returns a bool value, true if value1 is greater than value2
value1 ≥ value2  	 // Returns a bool value, true if value1 is greater than or equal to value2
SignalData -= value      // Set SignalData to the difference between its previous content and value
SignalData *= value      // Set SignalData to the product of its previous content with value
SignalData /= value      // Set SignalData to the ratio between its previous content and value
                            A floating point division is performed
value1 [ value2 ]  	 // If value1 is an array, the value2 th  element is returned.
                            If value1 is not an array, value2 is ignored.
Additionally, you have access to some useful functions for text manipulation or for conditional operations:
if(value1, value2, value3)        // If value1 evaluates to true, value2 is returned else value3
justify(string, nchar, fillchar)  // Right justifies string to get a nchar length. Blanks are filled with fillchar.
                                     fillchar must be 1 character length. E.g. justify( "45", 5, "0") produces "00045".
left(string, nchar)               // Returns the first nChar characters of string. E.g. left("45678",2) returns "45"
length(string)                    // Returns length of string. E.g. length("45678") returns 5
mid(string, pos, nchar)           // Returns nChars characters of string starting at pos. pos starts counting at 0.
                                     E.g. mid("45678", 1, 2) returns "56".
right(string, nchar)              // Returns the last nChar characters of string. E.g. left("45678",2) returns "78"
Any unrecognized name not starting by a number is considered as a custom variable. Custom variables are initialized by an empty string if there not in the left part of "=" assignment. They can be used in formulas like any constant or signal data.
When you click on ![]() , all equations are executed for all signals in the order the equations appear in the editor and in the order of signals in the viewer. Custom variables are persistent during the global loop. This way values can be "propagated" from the first signals to the next one.
, all equations are executed for all signals in the order the equations appear in the editor and in the order of signals in the viewer. Custom variables are persistent during the global loop. This way values can be "propagated" from the first signals to the next one.
The content of the editor can be saved or restored to a .headequ file (a simple text file in fact) by clicking on the button ![]() and
and ![]() respectively.
respectively.
Examples
Example 1 : Modify signal names
ShortFileName is the original file name without its complete path. The name of the signal is extracted from the ShortFileName.
Name=mid( ShortFileName,3,5 );
Example 2 : Set the sampling frequency to 100 Hz
Set sampling frequency to 100 Hz. Can be useful when loading signal from text files without header information. The sampling frequency is the minimum field required to display signals.
SampFreq=100;
Example 3 : Set the components
Set the component from the signal file name. ShortFileName is the original file name without its complete path. We assume that the file name contains a keyword indicating the component.
if(mid( ShortFileName, 12, 1 )=="E", Component="East");
if(mid( ShortFileName, 12, 1 )=="N", Component="North");
if(mid( ShortFileName, 12, 1 )=="Z", Component="Vertical");
Example 4 : Set comments
The comments contains here the name of the array.
Comments="RING01"
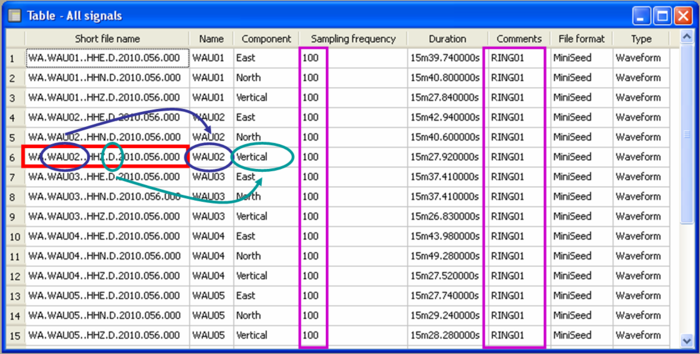
The application of the equations shown is the examples No 1, 2, 3 and 4 modify the headers as follow:

