Difference between revisions of "SciFigs: Make-up"
| (4 intermediate revisions by 2 users not shown) | |||
| Line 1: | Line 1: | ||
| − | A make-up is used to customize the appearance of | + | A make-up is used to customize the appearance of individual [[SciFigs:_Graph|graphic objects]] or [[SciFigs: Graphic sheet| Graphic Sheets]]. It includes all the information corresponding to the object Properties, such as X/Y axis limits, X/Y object position, Layers, and X/Y axis titles. |
| − | It | + | It can be saved in a .mkup file (which is a [[Xml_files| XML File]]) that can further be used for any other [[SciFigs:_Graph|graphic objects]] or [[SciFigs: Graphic sheet| Graphic Sheets]] of the same type as well as in a command line mode. |
| − | |||
| − | + | '''Note''': do not mix the two types of make-up files, unless you want to run into errors. | |
| − | |||
| − | [[Image: Properties.png|thumb| | + | '''Note''': only one type of context menu among the several available is shown. |
| + | |||
| + | |||
| + | = Building a make-up = | ||
| + | |||
| + | [[Image: Properties.png|thumb|right|300px|Select ''Properties'' in a context menu]]Make changes to the plot with the [[SciFigs: Properties|property editor]]. | ||
| + | |||
<br style="clear: both"/> | <br style="clear: both"/> | ||
| − | + | = Saving a make-up = | |
| + | |||
| + | [[Image: Save_Make-up.png|thumb|right|300px|Select ''Save make-up'' in the context menu]]Once all changes have been made in the plot, right-click on a blank part of the plot and select ''Save make-up'' in a context menu. | ||
| − | |||
| − | |||
<br style="clear: both"/> | <br style="clear: both"/> | ||
| + | [[Image: Make_up_property_filter.png|thumb|right|300px|''Make-up property filter'' pop-up window]] | ||
| + | |||
| + | When '''Save make-up''' is selected, '''Make up property filter''' appears in a pop-up window. | ||
| − | + | <br style="clear: both"/> | |
| − | + | Checked boxes have the following effects: | |
* '''X axis limits:''' keep the two end values of the x-axis | * '''X axis limits:''' keep the two end values of the x-axis | ||
| Line 29: | Line 36: | ||
* '''X object position:''' keep the x position of the plot in the page | * '''X object position:''' keep the x position of the plot in the page | ||
* '''Y object position''': keep the y position of the plot in the page | * '''Y object position''': keep the y position of the plot in the page | ||
| − | * '''Layers:''' keep the object [[SciFigs: | + | * '''Layers:''' keep the object [[SciFigs:_Graph#Layers|layers]] |
* '''X axis title:''' keep the x-axis title | * '''X axis title:''' keep the x-axis title | ||
* '''Y axis title:''' keep the y-axis title | * '''Y axis title:''' keep the y-axis title | ||
| − | + | [[Image: Custom Property Filter.png|thumb|right|300px|''Make-up property filter'' pop-up window with the ''Custom property filter'' window]] | |
| − | + | * '''Custom property filter''': for advanced make-up property customizing. When this box is checked a window opens inside the ''Make up property filter'' window ([[Geopsy: MakeUp_Customize|Example]]). | |
| − | |||
| − | |||
| − | |||
| − | |||
| − | |||
| − | [[Image: Custom Property Filter.png|thumb| | ||
| − | |||
| − | |||
| − | |||
| − | |||
| − | |||
| − | |||
| − | |||
| − | [[ | ||
<br style="clear: both"/> | <br style="clear: both"/> | ||
| − | |||
| − | |||
| − | |||
| − | [[Image: | + | The saving process continues by pressing [[Image: OK Button.png]]. |
| − | |||
| − | |||
| + | [[Image: Pop-up Window.png|thumb|right|400px|Browser pop-up window]] | ||
Choose a destination folder in the browser pop-up window. | Choose a destination folder in the browser pop-up window. | ||
| − | + | Type the name of the make-up in the appropriate text box. Do not include the extension (.mkup), it is added automatically. | |
| − | |||
| − | |||
| − | Type the name of the make-up in the appropriate text box. Do not include the extension, it is added automatically. | ||
End the saving process by pressing [[Image: Save Button.png]]. | End the saving process by pressing [[Image: Save Button.png]]. | ||
| + | <br style="clear: both"/> | ||
| − | + | = Applying a make-up = | |
| − | + | Select '''Restore make-up''' in the context menu. | |
| − | + | [[Image: Restore Make-up Menu.png|thumb|right|300px|Select ''Restore make-up'' in a context menu]]. | |
| − | |||
| − | [[Image: Restore Make-up Menu.png|thumb| | ||
<br style="clear: both"/> | <br style="clear: both"/> | ||
| − | |||
| − | |||
Latest revision as of 15:51, 13 February 2013
A make-up is used to customize the appearance of individual graphic objects or Graphic Sheets. It includes all the information corresponding to the object Properties, such as X/Y axis limits, X/Y object position, Layers, and X/Y axis titles.
It can be saved in a .mkup file (which is a XML File) that can further be used for any other graphic objects or Graphic Sheets of the same type as well as in a command line mode.
Note: do not mix the two types of make-up files, unless you want to run into errors.
Note: only one type of context menu among the several available is shown.
Building a make-up
Make changes to the plot with the property editor.
Saving a make-up
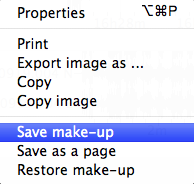
Once all changes have been made in the plot, right-click on a blank part of the plot and select Save make-up in a context menu.
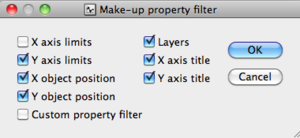
When Save make-up is selected, Make up property filter appears in a pop-up window.
Checked boxes have the following effects:
- X axis limits: keep the two end values of the x-axis
- Y axis limits: keep the two end values of the y-axis
- X object position: keep the x position of the plot in the page
- Y object position: keep the y position of the plot in the page
- Layers: keep the object layers
- X axis title: keep the x-axis title
- Y axis title: keep the y-axis title
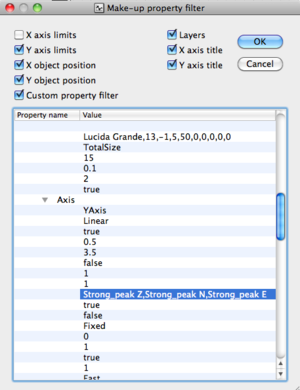
- Custom property filter: for advanced make-up property customizing. When this box is checked a window opens inside the Make up property filter window (Example).
The saving process continues by pressing ![]() .
.
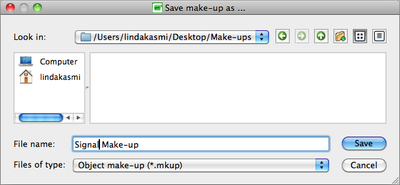
Choose a destination folder in the browser pop-up window.
Type the name of the make-up in the appropriate text box. Do not include the extension (.mkup), it is added automatically.
End the saving process by pressing ![]() .
.
Applying a make-up
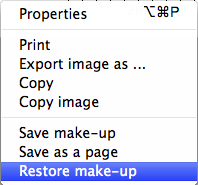
Select Restore make-up in the context menu.
.

