|
|
| (3 intermediate revisions by the same user not shown) |
| Line 8: |
Line 8: |
| | | | |
| | | | |
| − | A '''Menu''' allows to perform actions on a Graphic Sheet.
| + | = '''Graphic Sheet Menu''' = |
| | | | |
| − | <br style="clear:both"/>
| |
| | | | |
| − | = '''Graphic Sheet Menu''' =
| |
| | [[Image:SciFigs_GraphicSheetMenu.png|thumb|right|250px|Graphic Sheet Menu]] | | [[Image:SciFigs_GraphicSheetMenu.png|thumb|right|250px|Graphic Sheet Menu]] |
| | | | |
| − | In the '''Mac''' OS the menu is obtained with a mouse right click. It does not appear at the top of the Graphic Sheet window | + | In the '''Mac''' OS the Graphic Sheet menu is obtained with a mouse right click. It does not appear at the top of the Graphic Sheet window |
| − | | |
| − | In the '''Linux''' and '''Microsoft Windows''' OS both types of representation of the menu are available
| |
| − | | |
| − | When using the mouse to get the menu, the right click should be done '''outside''' any of the objects of the Graph Sheet.
| |
| − | | |
| − | == Properties ==
| |
| − | When clicking on '''Properties''' of the Graphic Sheet menu, a pop-up window appears.[[Image:SciFigs_GraphicSheetPrperties.png|thumb|right|200px|Graphic Sheet Properties]]
| |
| − | | |
| − | <br style="clear: both"/>
| |
| − | | |
| − | == File ==
| |
| − | [[Image: SciFigs_GraphicSheet_ImpotExport.png|thumb|right|250px|File menu]]
| |
| − | | |
| − | | |
| − | *'''New''': clears the current sheet
| |
| − | | |
| − | *'''Open''': open an existing sheet created as a [[Xml files|.page]] file
| |
| − | | |
| − | *'''Save''' and '''Save As''' are the usual actions
| |
| − | | |
| − | | |
| − | <br style="clear: both"/>
| |
| − | [[Image: SciFigs_GraphicSheet_Preferences.png|thumb|right|200px|Graph Sheet preferences]]
| |
| − | | |
| − | *'''Preferences''': to add or remove plugins. To add a plugin its path has to be entered in the lower box.
| |
| − | | |
| − | <br style="clear: both"/>
| |
| − | | |
| − | *'''Print''': usual action
| |
| | | | |
| − | *'''Export image''': the [[Xml files|.page]] file can be transformed into the following formats: PS, PDF, SVG, BMP, JPEG, PNG, PPM, XBM, XPM.
| + | In the '''Linux''' and '''Microsoft Windows''' OS both representations of the Graphic Sheet menu are available |
| − |
| |
| − | <br style="clear:both"/>
| |
| | | | |
| − | == Edit ==
| |
| | | | |
| − | [[Image: SciFigs_GraphicSheet_Edit.png|right|250px|Edit menu]]
| |
| | | | |
| − | <br style="clear:both"/>
| + | When using the mouse, the right click should be done '''outside''' any of the objects of the Graph Sheet. |
| | | | |
| | | | |
| − | In order to '''Edit''' one object it has first to be selected:
| + | '''NOTE''': The Graphic Sheet Menu allows to perform actions on the '''entire''' Graphic Sheet. |
| − | [[Image: SciFigs_GraphicSheet_Select_Blue.png|thumb|right|200px|The object not yet selected]]
| |
| − | When the mouse passes over an object the surrounding box becomes blue. The object is not yet selected.
| |
| − | <br style="clear:both"/>
| |
| | | | |
| − | [[Image: SciFigs_GraphicSheet_Select_Black.png|thumb|right|200px|The object is selected]]
| |
| − | After a mouse click the surrounding box becomes black.
| |
| − | <br style="clear:both"/>
| |
| | | | |
| − | '''The object is selected only after the surrounding box becomes black.'''
| |
| − |
| |
| − | It is not possible to select several objects by keeping the mouse pressed and moving it all over the objects of interest.
| |
| | | | |
| | + | '''MAIN ARTICLE''': [[SciFigs: Graphic Sheet Menu| '''Graphic Sheet Menu''']] |
| | <br style="clear:both"/> | | <br style="clear:both"/> |
| − | [[Image: SciFigs_GraphicSheet_Select_Black_Grey.png|thumb|right|350px|Several objects selected]]
| |
| − | To select several objects, keep holding the SHIFT button and select the objects of interest with the left click of the mouse. The surrounding boxes of the selected objects are gray, except the box of the last selected object which is black. This is also true when using the '''Select All''' action.
| |
| − |
| |
| − | <br style="clear:both"/>
| |
| − |
| |
| − |
| |
| − |
| |
| − | *'''Cut''', '''Copy''', '''Paste''', and '''Select All''' are the usual actions.
| |
| − |
| |
| − | *'''Copy image''' copies the entire Graphic Sheet.
| |
| − |
| |
| − | == Insert object ==
| |
| − |
| |
| − | A Graphic Sheet could include any of a [[ SciFigs: Graph| Graph]], a [[SciFigs: Palette | Palette]], an [[SciFigs: Image | Image]], a [[SciFigs: Legend| Legend]], and a [[SciFigs: Text | Text]].
| |
| − |
| |
| − | == Format Options (Save/Restore Make-up) ==
| |
| − | [[Image:SciFigs_GrapicSheet_FormatMenu.png|left|100px]]
| |
| − | For each object the user has the possibility to create a Make-up file (.mkup) that is an [[Xml_files| XML File]] and include all the information that correspond to the Properties of the object as the X/Y axis limits, X/Y object position, Layers, and X/Y axis title. This Make-up file be used for any other objects and also in a command line mode.
| |
| − | Additionally if the object is a [[Graph|Graph]] it is possible to save in a Layer file (.layer) that is an [[Xml_files| XML File]] all the layers that belong to it and also to add layers from a Layer file to the [[Graph|Graph]].
| |
| − |
| |
| − |
| |
| − |
| |
| | | | |
| | + | = '''Object Menu''' = |
| | + | Two menus allow to perform actions on the objects of a Graphic Sheet. |
| | | | |
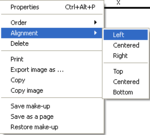
| | [[Image:SciFigs_GraphicSheet_Alignment.png|thumb|right|150px|Object menu that is provided if you press a right mouse click inside the object or at the lower left corner of the Graph object]] | | [[Image:SciFigs_GraphicSheet_Alignment.png|thumb|right|150px|Object menu that is provided if you press a right mouse click inside the object or at the lower left corner of the Graph object]] |
A Graphic Sheet is a group of objects that could be any of the following:
In the Mac OS the Graphic Sheet menu is obtained with a mouse right click. It does not appear at the top of the Graphic Sheet window
In the Linux and Microsoft Windows OS both representations of the Graphic Sheet menu are available
When using the mouse, the right click should be done outside any of the objects of the Graph Sheet.
NOTE: The Graphic Sheet Menu allows to perform actions on the entire Graphic Sheet.
MAIN ARTICLE: Graphic Sheet Menu
Two menus allow to perform actions on the objects of a Graphic Sheet.
Object menu that is provided if you press a right mouse click inside the object or at the lower left corner of the Graph object
If you open the Properties Box of the selected objects you will have the properties of the last selected object and with red color it will be marked the Properties that have different valued between objects. By changing the value of any property this will be changed for all the selected objects.
The user can select to view the order of the different objects (order button is highlighted and the user enters the order mode). The order number is seen in the upper left corner of its object. When the user is in this mode he can set the order of the objects from 1 to n (n is the total number of objects) where 1 corresponds to the object that is at the back and n is the object that is on the top of all.
If the user selects a number of objects he can use the Alignment Option in the Object menu in order to align the objects to the Left, Center, Right as horizontal alignment, or Top, Centered, Bottom as vertical alignment.

